Friday, October 31, 2014

How to Fix No Sound/Audio From Speaker

No sound or Audio output from your internal speakers is a common problem for most devices with built in speaker such as Laptops and Tablets. Regardless what model your laptop is (Acer, HP, Compaq, Asus, Lenovo, Toshiba and etc), there is a common solution for this. Here I will point out the problems and how to solve it.

The Basic Setting You Need To Check First
1. Make sure your volume is not muted. Click on the volume Icon and click mixer, for best result max up all volume by using the slider.
Click on the mixer for more volume options.
2. Make sure you already install the audio driver. You can tell if your system does have the audio driver installed or not by checking the driver status on the device manager. Normally if your computer need an audio driver, it will prompt "no audio device installed" if you try to play any audio file.

3. Make sure your audio device is enable. You can do this by go to device manager and look at sound, video and game controller, make sure your audio is enable.

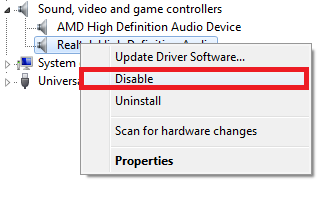
You can disable/enable your audio by right click on the audio device

p/s: If you are wondering why do people need to disable the audio? sometimes desktop user can get a separate Audio card, so they would disable the default on-board audio device, and of course this is optional.

4. I make changes to the setting, and Now the speaker does not work properly - Just use system restore to undo the changes, or click set to default setting on the audio setting (control panel).

Speaker does not work but headphone work 
The first thing to do is get a toothpick and stick it in the audio jack (gently wiggle it). This is because sometimes your audio jack sensors is jammed, and the computer thinks there is a headphone plugged in when there isn't. We use toothpick t unjammed it (you can use other object such as pin or needle).
If the toothpick does not work, try to set the speaker as default, you can read on how to do this here: http://laptop-driver.blogspot.com/2010/12/set-speaker-as-default.html

Headphone does not work, internal speaker work 
This problem is very rare, but in case it is happen to you first thing to do is make sure you are using the right jack. laptop normally have 2 jack, and desktop have 3 or 6 jack. For desktop the common color for audio jack is green. For laptop you will see a small icon located near to the jack which tells you either it is for headphone or for microphone.
Second, if you are using Realtek audio, make sure the jack setting is set to headphone instead of line out.
You can also try with another headphone, to make sure your current headphone is not the problem. Last but not least, sometimes you are using your mobile phone headphone/headset on your laptop and computer audio jack. Note that not all mobile phone headphone will work properly on laptop or desktop, sometimes you need to plug in halfway to hear the sound.

Speaker suddenly stopped/not working.
System crash, Windows update or Installing Third Party Software could interfere with your audio device. Windows update for example could install a new audio driver version, and it did install properly but the audio did not working (I get that a lot). So if your audio suddenly stopped working, there are 3 things you can do:

1. System Restore : We need to restore our computer back to where the audio is still working. This will also undo changes made by Windows Update or other software.
2. Recovery : Most notebook do have this option, for example Hp can use HP recovery manager, select hardware driver re-installation and select audio from the list.
3. Re-install the driver, try to re-install the drivers (original driver released by your notebook manufacture, not the latest driver by the device manufacture).

No sound from both internal speaker or headphone
Normally when this happen it means 3 things, your audio driver is not yet installed, your audio device is disabled or your internal speaker is broken. I already explain how to solve all this 3 problems above, to summarize the solution : Download and install audio driver for your computer, make sure your audio device is enable and if it is broken you need to replace internal speaker (You can't change notebook sound card), or get a USB audio card (it is cheap, about USD 3- 10 base on the model and functions). It is a plug and play device, which means you don't have to install driver, software or firmware, you just can use it right away.

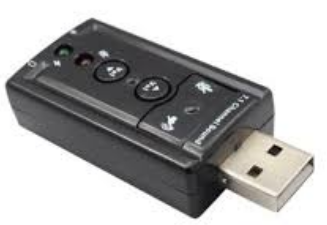
7.1 Channel External USB Audio Sound Card Adapter

Only One side of The Speaker is Working (Left/Right)
First of all, check your jack (make sure you plug the speaker properly (external speaker). Next is to check the audio balance (right and left) on your audio manager, example I am using realtek Audio so I just need to open realtek Audio Manager and Set the slider in the midlle between left and right.

If you have other problems with your speaker do let me know in the comment section below.

Thursday, October 30, 2014

Dell Inspiron 1546 Drivers for Windows XP/Vista/7

Compatibility: All drivers compatible with both 32-bit and 64-bit, unless separate download is provided.

Chipset
AMD M880G+SB820M
No installation required, but if you see SMBUS driver in device manager marked with yellow download the latest chipset driver from AMD.
Windows XP: Download
Windows Vista : 32-bit | 64-bit
Windows 7/8/8.1 : 32-bit | 64-bit

USB
AMD USB Chipset Driver
Windows Vista, Windows 7 : Download

Graphic/Video
ATI Mobility radeon HD 530v (refresh brand name of M92-LP)
Windows XP, Windows Vista, Windows 7 : Download
Windows Vista : Download
Windows 7 : Download

Graphic/Video
ATI Mobility radeon HD 4330
Windows XP : Download
Windows Vista : Download
Windows 7 : Download


Audio and Sound 
IDT High Definition Audio Driver (IDT 92HD81B1, A00)
Windows XP : Download
Windows Vista, Windows 7 : Download

Card Reader
Realtek RTS5159 Card Reader Driver
Windows XP : Download
Windows Vista, Windows 7 : Download

Touchpad
Alps Touchpad Drivers
Windows XP, Vista, 7 : Download
Windows Vista, Windows 7 : Download

LAN - Ethernet
Realtek RTL8103EL-GR
(Compatible for these cards : RTL8136, RTL8168 and RTL8169 Ethernet Adapter)
Windows XP : Download
Windows Vista : Download 
Windows 7 : Download

Wireless/WIFI:
There are 2 applicable/Variant for Wireless Drivers, choose one base on your specification. You can also test which work for you, installing wrong driver will not harm your system but remember to uninstall it later from the device manager.

Dell 1515 WLAN half-Mini card (Atheros AR5007)
Windows XP : Download
Windows Vista : Download
Windows 7 : Download

Dell 1397 WLAN half-Mini card (Broadcom 4312/4322)
Windows XP : Download
Windows Vista : Download
Windows 7 : Download

Wednesday, October 29, 2014

How to Stop Windows Keep Automatically Installing Drivers

Whenever you plug in a new device, or windows found a new hardware, Windows will detect and automatically install available in-box compatible drivers. It will also search the drivers on the web or via Windows Automatic Updates. The problem with this setting is whenever you uninstall a device from device manager, it will keep re-install it after reboot or after you select "scan for hardware changes". A very good reason to uninstall the current driver from device manager permanently is varies such as:

1. Windows install the default driver which does not work. When we uninstall it to install different drivers, it will re-install the previous drivers before we able to install the other driver.

2. The default driver version which windows keep installing is newer then the version we want to use, so windows will prompt "the current driver version is newer than this package".

1 : OPEN GROUP POLICY EDITOR
Click start and on the search box type gpedit.msc and press enter. This will open Group Policy Editor.
Click yes if prompted


2: Go through (Expand by clicking the arrow button) : Computer Configuration -System - device Installation and Click device installation Restriction. The on the right pane double click on " Prevent Installation of devices not described by other policy setting".
Click to enlarge
3. Select enable, you can always change this setting by clicking disable (by default this option is not configured).
4. Reboot to apply this change. Now your computer will not automatically install the drivers you already uninstalled.

Downgrade Windows 8 based PC to Windows 7

Most Windows 8 base PC such as HP Envy 15 notebook require BIOS/UEFI setup before you can downgrade it to Windows 7. Before we start I would like to point out important points:

For this tutorial :
  • We use Internal DVD/CD- ROM as install disk. (change it base on your boot disk such as flash drive or external DVD/CD-ROM). 
  • I strongly recommend to use Windows 7 SP1 because it is more stable and fix some bugs like remove pop-up notification about secure boot.

1.First step We need to access UEFI BIOS, here is how:
UEFI Firmware Setting on Windows 8
  1. Press the Windows key + C, or swipe in from the right edge of the screen to open your Charms. 
  2. Click Settings. Click Change PC Settings. In PC Settings, select General. 
  3. Scroll down to the bottom and Under Advanced startup, click Restart now. 
  4. In the boot menu, select Troubleshoot. 
  5. In the Troubleshoot menu, select Advanced options.
  6.  In the Advanced options menu, select UEFI Firmware Settings. 
  7. Click Restart to restart the system and enter UEFI (BIOS). 
  8. Make sure you already insert your windows 7 install disk before restart. 
 *UEFI/BIOS interface is different base on your notebook/PC


2.  Upon restart enter BIOS, make this changes:
The secure boot and Legacy support may located at different location base on your BIOS
  • Legacy Boot or Legacy Support : Enable
  • Secure Boot : Disable
  • Boot order : Change the boot order by select your DVD/CD-rom as the first boot device. 

  • note 1 : if you are installing using DVD) - If you are using USB Drive, make the USB Drive as the first boot device. Or - you can also change this boot device later (step 4)
  • note 2: you may need to press certain button to enter BIOS, example for HP 2000 you need to press F10
  • note 3 : New Bios - such Fujitsu AMI BIOS, secure boot is located under security panel. For most HP product it is located under system configuration.


3.Now press F10 to exit and save changes.

4. If you already set your first boot device (in step 2), skip this step, if not, upon restart - press ESC and press F9 to select your boot device.
Press F9 to select your boot device (windows 7 installation disk)

5. Select your boot device using the arrow key and press enter.(in this tutorial we use DVD/CD-Rom).
The Boot interface may look different base on your Notebook/PC
6. All Done, Windows 7 will start to install right away, (tutorial to install windows 7).


Partition Setup During Installation :

During Windows 7 installation, it will ask which partition you want to install windows 7. If you get the message:

"Windows can't be installed on drive 0 partition x " , 

you need to delete all partition and create a new partition before installing windows 7.
You can still create multiple partition later on by using disk management in Windows 7, for now just create one partition for Windows 7 Installation as your C drive). 


Additional Notes.

  1. Not all Notebook/PC require this setup to downgrade to Windows 7, try to install Windows 7 normally first and if there is an error mean you do need  to setup the BIOS/UEFI.
  2. Windows 8 base PC - Refer to  PC/Notebook/Desktop design specifically for per-installed with Windows 8. 
  3. If you have the USB 3.0 option on your BIOS, go to "System Configuration", "USB 3.0 Config in Pre-OS" and set to "Auto".
  4. If you are using USB Flash Drive as the boot device (Windows 7 install disk) - Make sure to format it as FAT 32 and use with USB 2.0 slot, do not use USB 3.0 slot.
  5. If you are Using SDD (mSATA drive) - Change the Sata otion to AHCI (we actually want to disable Intel Smart Response Technology).
  6. Each computer use different key to enter BIOS, check your manual for this or Google it. Here is some reference: 
  • Asus : F8
  • Sony : F2
  • Gateway : F10
  • Gigabyte : F12
  • Dell : Del/F12
  • HP/Compaq : F2/ESC
  • Acer : F2/F12
  • eMachines : F10
  • Toshiba : F12
  • Fujitsu : F12

If you have problems do let me know in the comment section below.

Monday, October 27, 2014

How to Upgrade or Replace Your laptop GPU

It is not difficult to replace your laptop graphic card, the hard part is to upgrade where you need to identify which graphic is better and compatible with your laptop. So how to identify which graphic card is compatible? for this one you need to get advice from laptop graphic card seller and they will tell you what is the compatible graphic cards you can buy for you laptop model. You also can call the service center or Google the Video Cards replacement parts for your model or read the Manuals. For example HP NX9420 and NW series can use Nvidia FX 1500M over AMD Mobility Radeon X1600.

A. Upgrade and Replacement Process
Get your laptop service manual, you will need to read the part removal and replacement. You can get it from your laptop manufacture site. For this tutorial we will replace Acer Aspire 7720 With ATI Graphic Card.

1. Remove the back cover by loosen the screw and open the back compartment.
*Note : For othe model such as HP or DELL or other models, the removal might be slightly different. Please refer your manual.

2. Next step is to remove the heatsink. Unscrew the driver and carefully remove the heatsink.

3. Now loosen the Graphic Chipset Screw, and carefully pull to remove it from the slot.

4. Insert you new graphic and apply fair amount of thermal paste.

5. Lastly put the heat sink back in place and close the back compartment.


C. Things to consider before Upgrade/Replacement.
1.Normally if there is only a slight increase in graphic performance after upgrade. You can't expect to get from 256MB to 512MB. Normally 251Mb to 358MB is the highest replacement I ever know.

2. This method originally intend for replacement where lot's of GPU is defect caused by high temperature.

3. Upgrade normally requires you to replace both Mainboard and GPU which costs more than a new laptop, so you better use that money to buy a new one instead of upgrading. Replacement on the other hand only requires a new the same new graphic chipset which is available on

4. If your graphic chipset is defect by overheating, make sure after the replacement the temperature is below 60 degree. Different graphic chip will produce different amount of heat and you need to observe the temperature carefully. Otherwise it will defect again after 30-days (or less).

Friday, October 24, 2014

Hp Envy x360 Windows 7/8/8.1 Drivers

 Envy x360 designed for 64-bit Windows operating system, you will not be able to get the full performance with 32-bit OS since it will use up only up to 4GB in 32-bit OS. HP release windows 8.1 64-bit drivers for this model but you can also use it for Windows 8 since both are using the same platform.


Windows 8 and 8.1 - Original Driver sets

Chipset
Intel Chipset Installation Utility and Driver
Version9.4.0.1026, 5.52M
Download

Audio
Realtek High-Definition (HD) Audio Driver
Version6.0.1.7219, 216.01M
Download

MEI
Intel Management Engine Interface (MEI) Driver
Version9.5.24.1790, 40.08M
Download

Graphic
Intel High-Definition (HD 4400) Graphics Driver
Version10.18.10.3574, 146.29M
Download

Keyboard, Mouse and Input Devices 
Intel Virtual Buttons Driver
Version1.0.0.14, 1.37M T
Download

LAN - Ethernet
Realtek Local Area Network (LAN) Driver
Version8.24.1218.2013, 5.99M
Download

Storage 
Intel Rapid Storage Technology Driver
Version12.8.9.1000, 17.17M
Download

Card Reader
Realtek Card Reader Driver
Version6.3.9600.21247, 12.16M
Download

Original Multimedia Software
Cyberlink Media Suite Software Version10.0.7.4023, 48.71M Download
Cyberlink MediaEspresso Software Version6.7.2.5308, 54.97M Download
Cyberlink Power2Go Software Version8.0.7.4016, 106.77M Download
Cyberlink PhotoDirector Software Version5.0.1.5406, 216.86M Download
Cyberlink PowerDVD Software Version12.0.4.4223, 152.12M Download

Webcam
Cyberlink YouCam Software
2014-07-28 , Version5.0.4.4218, 145.8M
Windows 7/8 : Download

Security
HP SimplePass Identity Protection Software
Version8.01.11 Rev. A, 88.33M
Download

Security
 HP 3D DriveGuard Software
Version6.0.19.1, 18.22M
Download

Tool
HP Utility Center
Version2.5.3, 6.42M
Download

Tool
ENERGY STAR Qualified Power Plan
Version1.0.9, 4.03M
Download


Windows 7 Drivers - Essential Drivers for 64-bit

If you plan to use windows 7 for this model, here is the drivers you will need to install. Of course Hp didn't release windows 7 for this model because it is design for Windows 8. The drivers is from HP,  Intel and Realtek. Other drivers will be installed automatically. If you are looking for latest drivers, use Microsoft automatic updates.

Chipset: Download
MEI : Download
Audio : Download
LAN - Ethernet : Download
Graphic : Download
Card Reader : Download

Notes : graphic driver is intel 4th generation processor with HD 4400
For the original multimedia software and webcam, you can the original software from windows 8/8.1.

Recovery
Order Recovery Media - CD/DVD/USB (‏1) USB - Windows 8.1 64b (Dual Language) Recovery Kit 2014-09-29 , VersionN/A System Recovery Kit for Consumer Notebook- Details
9:34:00 AM

Monday, October 20, 2014

How to fix Your Laptop Graphic Card

Heat is the main factor that cause laptop's video card failure. The continuous overheating cause the solder connection around the chipset melted and unseat. Base on your model, your graphic chipset (GPU) could be embedded on your motherboard or a removable type. You must read your manual on how to disassemble each component but basically you will need to remove the back compartment and you will see the heat sink and, GPU and CPU right away. What we actually want to do is to re-heated the GPU so that the solder connections seated again.

Fix Laptop Removable Graphic Chipset.

Certain laptop such as Acer models have a removable graphic chipset which allow your to remove them from the Main board.
Removable Laptop's Video Card
 First Step : Remove the back cover/compartment and then remove the heat-sink.

Second Step : Remove the graphic chipset and wrap it with aluminum foil or use a screw driver to create a gap between the GPU and the Oven.

Third Step : Put t in the oven for 10 minutes with 285 Degree.

Fourth Step : Allow it to cool before reassembling. (please apply fair amount of thermal paste on the GPU)


Fix laptop Embedded Graphic Chipset

For some laptop like Compaq Model, you can't remove the graphic chipset since it is permanently embedded to the Main Board.

First Step : Remove the back cover/compartment and then remove the heatsink.

Second Step : Cover all other components (except GPU) with aluminum foil to avoid heat to come in contact with other component.

Third Step : Apply the heat by using a HeatGun for about 40-50 seconds 1-inch above the GPU and apply it at the center of the GPU.

Fourth Step : Allow it to cool before reassembling.

Notes :
You can also use any tools that produce heat such a a hair dryer but of course it will take longer compare to HeatGun..

How to Upgrade/Replace Laptop's RAM - Guide

RAM (Random Access Memory) is a very important component for your laptop and computer performance. It allows you to run many program at one (multitask) without lagging and delay. Imagine the RAM as a table for your workspace, the bigger workspace means you can have multiple items on the table instead of small workspace allows limited items on the table.

It is not difficult to upgrade your laptop RAM, you just need to get a screwdriver or a small knife will do. Before start, you need to remove power chord and battery and also remove anything that attach to it such as USB Mouse and headphone.

1. First loosen the screw on the RAM compartment.

2. Open it  and you will see your RAM right away.
2. Most laptop have 2 RAM slots, if you own an old laptop you might see only one slot.
3. Pull the retention clip (1) and the RAM will tilts up(2) and pull it up to remove it from the slot(3). Make sure you don't touch the Golden part with your hand.

4. Now take your new RAM and press it at the memory slot (45 Degree angle) until it seated properly.
5. Press the RAM down until you hear a snap sound.
6. Now close the cover and we are done.

The ram slot and ram cover will be different base on your laptop model. Example most Compaq laptop (like picture above) have a very small cover while Acer laptop such as Extensa 4920 have a very large memory module cover.

Things you need to know Before Buying the RAM or Upgrade and Replacement
1. Make sure you use right RAM type such as DDR2 and DDR3. Most current Laptop use DDR3. You can identify your RAM by looking at the RAM itself and  I always advice my friend to pull out one RAM, go to the store and show the RAM so they can give you right RAM for your laptop.

2. If you are using 2 RAM slots. The best practice it to use the same RAM for both slots such as 4GB(amount) DDR3(type) 1333Mhz(clock) x 2 slots.

3. Know your RAM limits. You laptop do have limit on how much RAM you can put on them. If you use 4GB x 2slots = 8GB total, but your laptop will read only 4GB if it only support up to 4GB of RAM.

Memory Limits depend on Operating System
Each operating system does have limit, depend on your operating system you should plan your upgrade properly. If you installed more than what it do support,you computer will boot up properly and it will  show a message like this : 8GB installed memory (4GB Usable). Here is example for Windows 7, you can get all windows memory limits here.

VersionLimit on X86Limit on X64
Windows 7 Ultimate4 GB192 GB
Windows 7 Enterprise4 GB192 GB
Windows 7 Professional4 GB192 GB
Windows 7 Home Premium4 GB16 GB
Windows 7 Home Basic4 GB8 GB
Windows 7 Starter2 GBN/A

Monday, October 13, 2014

Compaq Presario 061 Drivers and Details (SR1250ND)

Compaq Presario SR1250ND is also known as Compaq Presario 061 and design as a Windows XP base Desktop PC. HP released official Windows XP drivers support for this model if you does not have the Driver and Utility Installer CD/DVD.

Original and Official Drivers - Windows XP

CHIPSET: Summer 2005 Original Intel Chipset Drivers : Download
AUDIO/SOUND : Summer 2005 Original Realtek AC'97 Audio Drivers : Download
GRAPHIC/VGA : Summer 2005 Original nVidia Graphics Driver : Download
KEYBOARD/MOUSE : Summer 2005 HP Multimedia Keyboard Mouse Driver : Download
LAN - Ethernet : Original Realtek LAN (Local Area Network) LAN Drivers : Download

Drivers for Windows 7 Upgrade

Presario 061 (SR1250ND) Does Support Windows 7 and it passes the minimum requirements to run Windows 7. You can get all  the drivers installed automatically by using Microsoft Automatic Updates. Or you can also download them separately by using the link below:

Chipset: Intel Chipset Device Software From Microsoft - Download
Audio : Realtek AC'97 Audio Driver from realtek : Download
Graphic: Nvidia GeForce 6200 with Turbo Cache from Nvidia : Download
Keyboard and Mouse : Automatically Installed
LAN : Realtek RTL8139 from realtek : Download

Specification and Information (Product No : EC518AA) - Norway/Denmark

Processor : Pentium 4 516 (P) 2.93GHz
Processor Socket : 775
Chipset : Intel 915P
RAM : Up to 4GB DDR2  (1GB x 4slots)
RAM SPEED : PC2-4200 MB/Sec
HDD : 160GB SATA - 7200RPM
Chipset : Intel 865, 915, and 945 Family Chipsets
Graphic Card : nVidia GeForce 6200 TurboCache graphics
LAN : Realtek RTL8139 Family Fast Ethernet Network Interface cards.

Friday, October 10, 2014

4 Simple Steps to Clean a Laptop Screen

Cleaning your laptop screen or monitor is not hard since you can you your household products to do it. You don't have to buy a LCD cleaning products since

1. Turn off your laptop or LCD/LED Monitor :
Remove any power source such as power chord to avoid the electricity flow.

2. Create Your own Cleaning Solution.
You can simply use plain water, but it is better to mix it with organic solution such as vinegar. If you worried about the vinegar smell,  replace it with perfume . (I always use perfume, just make sure use a very small amount, you don't want to work with strong smell, trust me!).

3. Remove Dust by using Dry Lint and Brush.
First just wipe your screen without solution, just use Lint, and then use paint brush to remove dust and clean the screens' edge.

3. Use Lint-Free Cloth or Your old T-shirt
It does not really matter what type of household item your want to use to wipe the LCD or screen, just make sure it is smooth and do absorb water. Apply a small amount of water or solution we created, make sure it is not too wet. I prefer to use empty spray bottle, the wipe your screen gently. (don't use excessive force to wipe because it could damage your screen pixel).

4. Final Touch
Again by using dry Lint Cloth wipe your screen again to remove any excessive solution/water on your screen.

Summary:
I'm not a very careful guy, normally I just spray some water and let it there for 1 minute, then wipe with my old towel. I did this for about 7 years for both my laptop and my LED monitor.

Thursday, October 9, 2014

Download Driver Asus B43S for Windows XP (32/64bit)


Download Driver Asus B43S for Windows XP (32/64bit)

Chipset DriverChipset Intel INF Update DriverDriver Version : V9.2.0.1021Driver Size : 2.55 MBFile name : Chipset_Intel_WinXP_Z9201021.zipDownload


USB DriverFresco USB3.0 DriverDriver Version : V3.3.22.0Driver Size : 8.69 MBFile name : USB3_Fresco_WinXP_32_Z33220.zipDownloadCard Reader DriverRealtek Multi-Card Reader DriverDriver Version

computer science course online | computer science degree syllabus | computer science help online | computer science learn online | computer science lectures online | computer science online course | cs final subjects | cs online school | degree computer | degree in programming | free computer classes online | free online computer classes | intro to computer science online | learn computer science online | learn computer science online free | mit computer science online | msc computer science online | online bachelor in computer science | online bachelor of computer science | online bsc computer science | online computer classes | online computer classes free | online computer coding classes | online computer coding courses | online masters cs | online ms in cs | online msc computer science | online projects for computer science students | programming degree | teach computer science online | what is computer science degree

Labels

brand new desktop computers
cheap refurbished laptops
computer desktop packages
computer discount
desktop computer new
desktop computer package deals
desktop computer packages
desktop pc package deals
desktop pc packages
discount computer parts
discount computers
discount desktop computers
discount laptop computers
laptop computer sales
laptop computers for sale
laptop sale
laptops for sale
new computer desktop
new desktop
new desktop computer
new desktop computer with windows 7
new desktop pc
new pc desktop
new windows 7 desktop computers
pc desktop package
refurbished computers
refurbished desktop computers
refurbished laptops
refurbished notebooks
refurbished pc
used laptop for sale