Showing posts with label 1-COSTUM INSTALLATION. Show all posts

Saturday, November 14, 2009

Installing conextant smart audio 221 Windows XP

Last update on 6/22/2014
This guide for most HP and Compaq Laptop especially Presario CQ60, CQ60 series and V3700 and related model, you can leave your comments if you have problems.

AUDIO INSTALLATION:

1. Fisrt for Audio installation you need to install KB888111 first and restart.

Microsoft Universal Audio Architecture
Knowledge Base 888111 (KB888111)
Download (Intel site) 
Download (from HP)

2. Download Your audio driver and extract it (you need winrar software to extract it)

Conextant Smart Audio 221 Drivers
Version 3.49.4.51 1.02MB
Download (mf link)
Download (sd link)
Download (4s link)
(footnote: for future reference Other applicable driver by file name smartaudio221_360a)


INSTALLATION:

1. Click start and select run, type "devmgmt.msc" like shown in the pictures below.


2. A windows will appear like pictures below, select the "Audio Device on High Definition Audio Bus" with the yellow mark, right click on it and select update driver.


3. Harware update wizard screen will appear, select no to connect, next

---------------------------------------

4.Select Install from list specific location, next

--------------------------------------------------

5. select don't search i will choose the driver to install, next


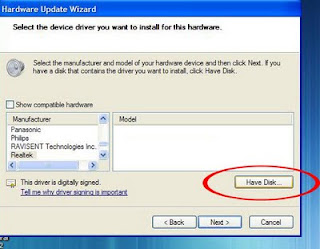
6. Remove the check from "Show Compatible Hardware" and click on "Have Disk".


7. then select browse:

8.Next...browse to the unzipped folder (i assume you extract it at desktop) and open the folder, choose the "WAHER5a.inf".


10. click open, next, Ignore XP when it complains.Reboot.

Wednesday, November 11, 2009

Installing Sound in Compaq CQ Series

Compaq Presario CQ series here including CQ40, CQ35 and CQ45. This method also applicable to other model which use IDT audio drivers. For other CQ model which use Conextant audio the patch installation and method is similar, the difference is you need to locate conextant audio drivers.
Last update: June 14 2013

PATCH INSTALLATION

If you already install ms-uaa you may skip this step.
 Before proceed with audio Installation you need to install Microsoft Universal Audio Architecture first. Below is the patch you needed.

Microsoft Universal Audio Architecture (MS-UAA)

Windows XP, XP SP2:  Knowledge Base 888111 (KB888111)
Download 

Windows XP SP3:Knowledge Base 835221 (KB835221)
 Download  (KB835221)

This downloads also available in Microsoft website, you just need to search the KB888111..etc.


DOWNLOAD AND INSTALL: IDT AUDIO DRIVERS

I provide few driver version here which reported work in most CQ40. The trick is simple, you just need to get your original vista drivers first. Here is the recommended and tested driver version.

SP39671.exe: Download - recommended (original xp driver for IDT)
SP41693.exe: Download 
SP45100.exe: Download
SP41616.exe: Download
 
Now Install the driver you selected from the list above or your original vista drivers. (do not restart) If the installation successful with no error, try any audio file for confirmation. If it resulting in error, or no sound after successful installation proceed with next step.

MANUALLY INSTALL DRIVER

This manual installation is also know as "have disk method".

1.First open device manager by click start and select run type "devmgmt.msc" as shown in the pictures below.


2.Below you will see there are many drivers with yellow, select the Audio with the yellow mark, right click on it and select update driver.


3. Harware update wizard screen will appear, select no to connect, next


4.Select Install from list specific location, next


5. select dont searh i will choose the driver to install, next

6.then select all drivers on the next screen then make sure you uncheck the "show compatible drivers" box, select have disk

7. then select browse:


8. Then browse to the directory c:\swsetup


9. Ok in this step i will show for SP39671 audio. So after open the swsetup folder select the SP36971 Folder. If you use other audio make sure to select the folder name similar to yours example: sp45100.


10. After open the SP39671, there 3 folder and select the wdm folder. For other audio driver maybe you will have the similar folder or different, Important to remember we a re looking for files ended with INF extension. Here for SP39671, after open the folder slect WDM folder and Select WInXP folder


11. Then select the STHDA.INF (STHDA64.INF is for 64 bit) anyway press OK . Ignore if XP Complaint. then try to play some music (suggested simple mp3, no rmvb, flv or other player that require codec).
INF file may have different name if you are using different driver version
In case the audio driver you have and i gave earlier didn,t work leave your comments and i will assist you for further instructions.


HDMI and NO SOUND AFTER RESTART

Some model will have issue with HDMI. To know either you have this issue or not, Simply after driver installation above a "new hardware found" windows appear. Download this driver first:
SP39545.exe

Now install this this driver first (do not close a new hardware found windows), after finish install, get back to the "a new hardware found windows" follow the audio installation we did earlier until we get the inf file.

In case the Audio Disappear After restart follow the Guide here:

AUDIO DISAPPAER AFTER RESTART: PART 1
AUDIO DISAPPAER AFTER RESTART: PART 2

Wednesday, October 28, 2009

Sound Disappear After Restart - Part 2

Here is the second method for most Compaq CQ which the sound disappear after restart.
this solution regarding to audio works after installing batch file KB835221.

Download the CQaudiosolution: (Link fixed on March 22 2015)


Inside the RAR file there is an audio patch and devcon patch file. Devcon file will solve issue with KB835221 (missing PnP function id). Follow the given instruction below

a) You must install two patches first from Microsoft: KB835221 (UAA version 1.0) and then kb888111 (UAA update version 1.0a)

b) Install the IDT HD Audio driver (you can use your Vista driver from HP site as well)
c) Extract CQAudioSolution.rar you've downloaded
d) Extract devcon.exe self-extracter from Devcon folder extracted in c)
e) Copy devcon.exe from extracted folder in (d) to C:\WINDOWS\SYSTEM32
f) Run Audio path from extracted Audio Path folder in c)
g) Restart
h) You should be able play sound with IDT HD Audio after restart.

However, in Device Manager, there is a exclamation icon on "Audio Device on High Definition Audio Bus". This is installed by KB835221 patch. Just ignore it. The CQAudioSolution will make sure that there is no more issue with missing IDT HD Audio when restarting after installing the IDT HD Audio driver.

Credits:
t3chn0m4nc3r

Tuesday, October 27, 2009

Slipstreaming Guide To install Windows XP

In 2009, Serial ATA (SATA) has mostly replaced parallel ATA. So installing Windows XP will cause BSOD for certain model, to solve the problems we need to integrate SATA into windows XP Installation disk and this process called slipstream.

Content:
A :Materiel Needed
B: Sata Driver Download
C: Slipstream Guide


Material needed:

1.Nlite Software: Download Here
2. Windows XP CD
3. Empty CD-R/DVD-R

Sata Driver Download

Extract the driver using winrar.
Intel Sata Driver: Download Guide (Intel has moved the download link)
AMD Sata Driver: Download
Nvidia Sata Driver: Download

How to check my model need Intel, AMD or Nvidia sata drivers?
Install CPU-z and run the program, look at the chipset on mainboard tab.
it will show you what type of Chipset you have AMD/ATI, Intel or Nvidia, so select the Sata base on your chipset.

additional info:
If you want more details with pictures, you can read my post:  Sata driver for slipstream process here.
If you download the sata directly from Intel (for Intel model), you can found the instruction to extract it here.


Slipstream Guide


1. create a new folder and name it as "WINXP" or any name you like, copy all the content in your xp installation disk (explore cd and press ctrl+A) and paste it in the new folder you just created.
2.Extract the sata driver you downloaded.
3. Intsall Nlite and run it. On the first screen just click next.


4. Now locate/browse to the folder "WINXP" you created.

5.Next and you will come to "Presets", ignore this and click "Next".

6. In "Task Selection", choose "Drivers" and "Bootable ISO" by high-lighting them.

7. For intel select single driver
For amd select multiple driver

8. For intel Browse to the SATA driver folder which you extracted earlier(I named it "Floppy32Bit") and select either one of the .INF file, i suggest "iaahci.inf".

-for amd browse to raid 7xx, slect x86 and select the inf files.
SELECT ONLY x86.


9) A screen like below will pop-up, make sure it's "Textmode driver" and select all of them by holding CTRL+A key and choose "OK", the pictures below for intel installation.

If you arrive at this step for installation its similar for both amd and intel.


10) You shall see something like this. Choose "Next" and you will be prompted.


11) Choose "Yes" to start the process.


12) Let it finish and choose "Next".


13) Finally, you can create your project as ISO image or burn it directly to CD-R under "Mode". choose "Direct Burn". You can put anything for "Label" but not too long. Choose "Burn" and you will be prompted again. You can also choose to create iso to burn using software such as nero.


14) Choose "Yes" to burn it to CD-R. Wait for it to finish and choose "Next"


15) Choose "Finish" to exit nLite.
Additional notes.
-If your slipstreaming process unsuccessful, you can repeat the process but create a new folder and DO NOT USE THE SAME FOLDER.

Monday, October 26, 2009

AUDIO DISAPPEAR AFTER RESTART - COMPAQ

This tutorial is part of the IDT audio installation which you can read here. So after the audio installation sometimes for certain model the audio work just fine after installation but disappear after restart.

SOLUTION

1. Download devcon utilities. link below
http://support.microsoft.com/kb/311272
(link updated on Friday 29 June 2012)

2. Open a notepad and paste the following line,and name the notepad as audiopatch.bat, save the file at c:\patch\ with the name audiopatch.bat. (if the directory c:\patch don't exist create one. The Hardware ID may differ (i never study about the differences between ID) this is commonly what i found. Paste the code


DEVCON.EXE RESTART “PCI\VEN_8086&DEV_293E&SUBSYS_3607103C&REV_03″


To manually check your hardware ID follow this Guide:

a) Open device manager by click start, select run and type: DEVMGMT.MSC


b) Right click at your audio drivers and select properties like the picture below.


c)then select details.


d) Select Hardware ID by expanding the Device description Drop down menu.


e)Then here you found your hardware ID which circle in red as shown in pic below. (The ID below is for my Desktop, REALTEK Audio so it difference with your ID). right click on it san select copy then paste it as note


3. Then extract file devcon.exe, copy \i386\devcon.exe to the c:\patch\ (in the folder where you save the audiopatch.bat).

4.Now, there are two options here, the simple steps is to right click on the audio patch, send to, desktop, whenever you start your computer double click on it, the sound should work. If you want it to automatically start every time you turn on your laptop. Continue read the tutorial below, the advantage is you don't have to double click every time you start your notebook.


MODIFY THE REGISTRY


1. click start select run and type regedit.


2. find this value:

HKEY_LOCAL_MACHINE\SOFTWARE\Microsoft\Windows\CurrentVersion\Run

expand it by click the + icon
3. click on the run, on the right panel click anywhere and select new - string value( anew string value will appear normally with name new value#1.)


4. right click on the new string you create and rename as audiopatch.
5.double click on it and on the value data write c:\patch\audiopatch.bat

DONE.

computer science course online | computer science degree syllabus | computer science help online | computer science learn online | computer science lectures online | computer science online course | cs final subjects | cs online school | degree computer | degree in programming | free computer classes online | free online computer classes | intro to computer science online | learn computer science online | learn computer science online free | mit computer science online | msc computer science online | online bachelor in computer science | online bachelor of computer science | online bsc computer science | online computer classes | online computer classes free | online computer coding classes | online computer coding courses | online masters cs | online ms in cs | online msc computer science | online projects for computer science students | programming degree | teach computer science online | what is computer science degree

Labels

brand new desktop computers
cheap refurbished laptops
computer desktop packages
computer discount
desktop computer new
desktop computer package deals
desktop computer packages
desktop pc package deals
desktop pc packages
discount computer parts
discount computers
discount desktop computers
discount laptop computers
laptop computer sales
laptop computers for sale
laptop sale
laptops for sale
new computer desktop
new desktop
new desktop computer
new desktop computer with windows 7
new desktop pc
new pc desktop
new windows 7 desktop computers
pc desktop package
refurbished computers
refurbished desktop computers
refurbished laptops
refurbished notebooks
refurbished pc
used laptop for sale